
In this technological era, SSDs have revolutionized storage by offering faster data access, quicker boot times, and improved responsiveness compared to traditional Hard Disk Drives (HDDs). Understanding How to Allocate SSD in Windows 11 and manage SSD space in Windows 11, along with implementing optimization strategies, allows users to maximize the advantages offered by this advanced storage technology.
Throughout this guide, we’ll explore essential tips, techniques, and step-by-step instructions to effectively allocate SSD space, enable critical features like TRIM support, perform regular maintenance tasks, and optimize settings in Windows 11. By following these practices, users can harness the power of their SSDs to achieve enhanced performance, prolonged lifespan, and a smoother computing experience.
Introduction:
Efficient allocation of Solid State Drive (SSD) space in Windows 11 is crucial for optimizing system performance and maximizing the benefits offered by SSD technology. SSDs offer numerous advantages over traditional hard disk drives (HDDs), primarily due to their faster read/write speeds and improved responsiveness. Here’s why allocating SSD space efficiently in Windows 11 is essential:

Table of Contents
- Faster Performance: SSDs deliver significantly faster data transfer rates compared to HDDs. Efficient allocation ensures that the SSD is utilized optimally, allowing quicker access to files and applications. This speed boost leads to faster boot times, reduced application loading times, and overall system responsiveness.
- Extended Lifespan: SSDs have a finite number of write cycles. Efficient allocation helps in minimizing unnecessary write operations, thus prolonging the lifespan of the drive. Techniques like minimizing unnecessary read/write operations, reducing fragmentation, and managing temporary files contribute to this aspect.
- Improved System Stability: Efficient space allocation prevents SSD overcrowding, which can lead to performance degradation or system instability. Ensuring a healthy amount of free space on the drive helps in maintaining its performance consistency over time.
- Enhanced File Organization: Properly organizing data on an SSD can improve file access times. Techniques like defragmentation (though less necessary for SSDs) or using tools like Windows Storage Sense can help organize and manage files efficiently, preventing fragmentation and maintaining optimal performance.
- Utilization of TRIM Command: Windows 11 supports the TRIM command, which assists in maintaining SSD performance by clearing unused data blocks. This command helps in garbage collection, ensuring that the SSD efficiently manages data storage and maintains its performance levels.
- Optimized Storage Usage: Windows 11 features tools like Storage Spaces and Disk Cleanup that aid in managing and optimizing SSD space usage. These tools allow users to identify unnecessary files, temporary data, or large files that can be safely deleted or moved to free up space.
In essence, efficient allocation of SSD space in Windows 11 is crucial for maximizing the benefits of SSD technology, ensuring faster performance, longer lifespan, improved system stability, and better overall user experience. Regular maintenance, such as managing files, optimizing storage, and using built-in Windows utilities, can help users make the most out of their SSDs.
Section 1: Understanding SSD Allocation
SSD allocation in Windows 11 involves the way the operating system manages and organizes data storage on Solid State Drives compared to traditional Hard Disk Drives (HDDs). There are notable differences in how Windows 11 handles space allocation on SSDs versus HDDs:
1. File Storage and Fragmentation:
- HDDs store data on spinning disks with read/write heads accessing different parts of the disk. Fragmentation occurs when files are stored in non-contiguous sectors, affecting read/write speeds. Windows traditionally used defragmentation to organize files on HDDs, which rearranged data for faster access.
- SSDs, however, have no mechanical parts and access data electronically. They do not suffer from the same performance issues caused by fragmentation. In fact, excessive defragmentation can reduce an SSD’s lifespan. Hence, Windows 11 doesn’t defragment SSDs; instead, it utilizes a process called TRIM, which helps in maintaining optimal performance by clearing unused blocks.
2. Wear Leveling and Over-provisioning:
- SSDs have a limited number of write cycles per memory cell. To prevent certain cells from wearing out faster than others, SSDs utilize wear-leveling algorithms that evenly distribute write operations across the drive.
- Over-provisioning refers to reserving a portion of an SSD’s capacity for background tasks and wear-leveling. Windows 11, by default, may reserve a small percentage of an SSD’s space for these purposes to ensure better performance and longevity.
3. Allocation Units and Formatting:
- Both SSDs and HDDs use allocation units (also known as clusters) for storing data. Windows 11 formats both types of drives using default allocation unit sizes optimized for their respective technologies. SSDs often benefit from smaller allocation unit sizes due to their faster access times.
- Windows 11 allows users to format drives during installation or via Disk Management, providing options to choose the file system (NTFS, exFAT, etc.) and the allocation unit size. Properly aligning allocation units on SSDs enhances their efficiency.
4. Storage Optimization and Management:
- Windows 11 offers tools like Storage Sense that manage storage efficiently, irrespective of the drive type. It helps users identify and remove temporary files, manage system backups, and optimize storage usage to free up space on both SSDs and HDDs.
- SSDs benefit more from such management due to their faster read/write speeds, making it essential to keep them free of unnecessary clutter to maintain peak performance.
In summary, Windows 11 manages SSDs differently from HDDs by refraining from defragmentation, employing TRIM for maintenance, optimizing wear leveling, and possibly reserving space for over-provisioning. Understanding these differences allows users to make informed decisions when managing and optimizing storage on SSDs in Windows 11 for enhanced performance and longevity.
Section 2: Preparing Your System
Check System Requirements
1. SSD Compatibility:
Ensure that your device supports and has an SSD installed. Most modern computers support SSDs, but it’s essential to have an SSD installed in your system to allocate and benefit from its features.
2. Windows 11 Compatibility:
Verify that your computer meets the minimum system requirements for running Windows 11. As of my last knowledge update in January 2022, the basic requirements for Windows 11 include:
3. Sufficient Free Space on SSD:
Ensure that the SSD has enough free space for efficient allocation. Having ample free space allows the SSD to function optimally and prevents performance degradation. Aim to keep at least 10-20% of the SSD capacity free for wear leveling, over-provisioning, and maintaining performance over time.
4. Administrative Privileges:
Allocate space on an SSD typically requires administrative privileges or an account with administrator access to perform tasks like partitioning, formatting, or managing storage space.
5. Compatibility with Windows Features:
Some advanced SSD features such as TRIM may require proper SSD support from both the hardware and the Windows operating system. Generally, most modern SSDs are compatible with Windows 11 and its associated features.
Always ensure you have backed up your data before making any significant changes to disk allocation or storage configurations to prevent accidental data loss. Additionally, periodically check for firmware updates for your SSD and keep Windows 11 up-to-date to benefit from the latest enhancements in SSD management and allocation.
Backup Important Data:
Backing up important data before making changes to disk allocation is an essential practice that cannot be overstated. Here’s why it’s crucial:

1. Risk of Data Loss:
Altering disk allocation involves tasks like partitioning, formatting, or reconfiguring storage space. Any error during these processes can result in data loss. Accidental deletion of partitions, formatting the wrong drive, or encountering unexpected issues might lead to irreversible data loss.
2. Human Error and Unforeseen Circumstances:
Mistakes can happen during disk management procedures, especially if you’re unfamiliar with the process or using complex tools. Additionally, unforeseen events like power outages or system crashes during disk allocation tasks can corrupt or damage data.
3. Protecting Against Hardware Failure:
While not directly related to disk allocation changes, hardware failures can occur at any time. Having a recent backup ensures your data is safeguarded against potential SSD failures or any other hardware malfunctions.
4. Recovery in Case of Issues:
If the disk allocation changes result in system instability, boot failures, or other issues, having a backup allows you to restore your system to its previous state without losing valuable data.
Given these reasons, backing up data before modifying disk allocation is crucial. Here’s how you can ensure a proper backup:
- External Storage or Cloud Backup: Use an external hard drive, USB flash drive, network-attached storage (NAS), or cloud storage services to create a backup of your important files, documents, photos, videos, and any other data you can’t afford to lose.
- Backup Software: Utilize backup software that provides comprehensive and automated backups, enabling you to easily restore your data if necessary.
- Regular Backup Routine: Develop a habit of regular backups, either scheduled or performed periodically, to ensure that your backup remains up-to-date.
Taking the time to back up your data before making changes to disk allocation is a proactive step that can save you from potential data disasters. It provides peace of mind and a safety net in case anything goes wrong during the disk management process.
Section 3: Allocating SSD in Windows 11
Accessing Disk Management:
- Using the Search Bar:
- Click on the Windows icon or press the
Windows keyon your keyboard to open the Start Menu. - Type “Disk Management” in the search bar located at the top of the Start Menu.
- Click on the Windows icon or press the
- Accessing via Run Command:
- Use the
Windows key + Rkeyboard shortcut to open the Run dialog box. - Type
diskmgmt.mscin the Run box and pressEnteror click on “OK.”
- Use the
- Using Windows Settings:
- Click on the Windows icon to open the Start Menu.
- Click on the “Settings” icon (shaped like a gear) or use the
Windows key + Ikeyboard shortcut to open Windows Settings. - In the Settings window, select “System” from the left-hand sidebar.
- Scroll down on the right side and click on “Storage.”
- Under the “More storage settings” section, select “Disk Management.”
- Accessing via Control Panel:
- Open the Start Menu and type “Control Panel.”
- Open the Control Panel app.
- In the Control Panel, set the view to “Large icons” or “Small icons” (if it’s in category view).
- Click on “Administrative Tools.”
- Double-click on “Computer Management.”
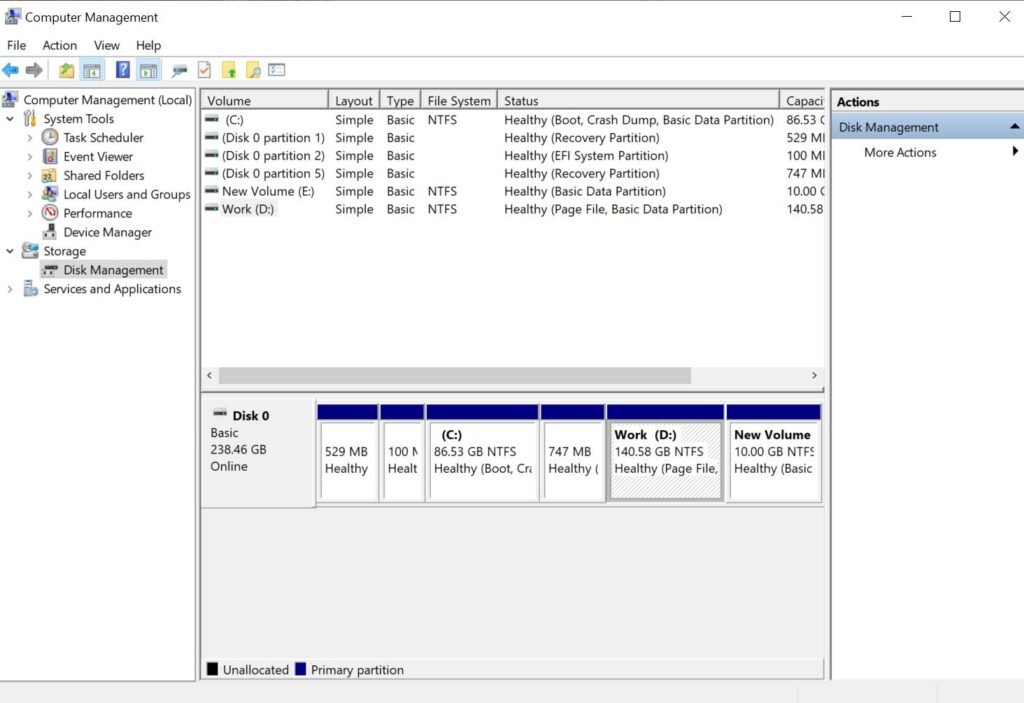
- In the Computer Management window, expand the “Storage” section from the left pane and select “Disk Management.”
Allocating Unallocated Space:
- Access Disk Management: Open Disk Management using one of the methods mentioned in the previous explanation.
- Locate Unallocated Space: In Disk Management, you’ll see a graphical representation of your drives. Unallocated space appears as a black bar without any partition label.
- Create a New Partition from Unallocated Space:
- Right-click on the unallocated space.
- Select “New Simple Volume” from the context menu.
- New Simple Volume Wizard:
- The New Simple Volume Wizard will open. Click “Next” to proceed.
- Specify the size for the new partition. By default, it will use the entire unallocated space. You can adjust the size if needed.
- Click “Next.”
- Assign Drive Letter or Path:
- Choose an available drive letter for the new partition or select “Mount in the following empty NTFS folder” to mount it as a subfolder within an existing drive.
- Click “Next.”
- Format Partition:
- Select a file system (usually NTFS for Windows) and set the allocation unit size (you can leave it as default).
- Enter a volume label (optional) to name the partition for easy identification.
- Check the “Perform a quick format” box.
- Click “Next.”
- Completing the Wizard:
- Review the settings you’ve chosen for the new partition.
- Click “Finish” to create the new partition using the unallocated space.
- Extended Existing Partition with Unallocated Space:
- If you want to extend an existing partition using the unallocated space:
- Right-click on the partition you want to extend.
- Choose “Extend Volume.”
- Extend Volume Wizard:
- The Extend Volume Wizard will open. Click “Next.”
- Select the unallocated space available for extension.
- Click “Next.”
- Completing the Wizard:
- Review the information presented.
- Click “Finish” to extend the selected partition with the unallocated space.
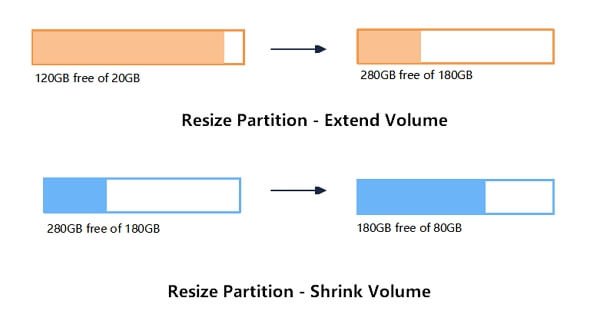
Resizing Partitions:
- Access Disk Management: Open Disk Management using one of the methods mentioned earlier.
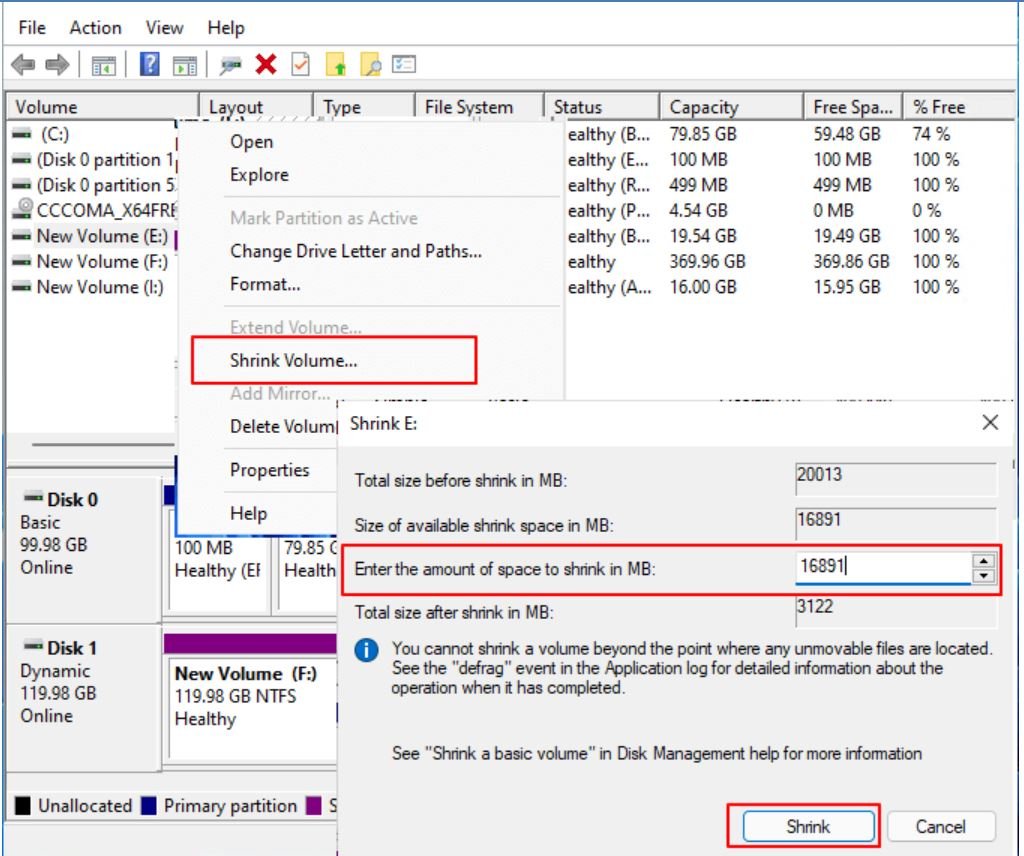
- Identify Partitions: In Disk Management, you’ll see a graphical representation of your drives and their partitions. Determine the partitions you want to resize, especially if you intend to shrink one partition to allocate space to another.
- Shrink a Partition:
- Right-click on the partition you wish to shrink to free up space (e.g., a larger partition with unused space).
- Select “Shrink Volume.”
- Shrink Volume Wizard:
- The wizard will calculate the amount of space available for shrinking. Enter the amount of space you want to shrink in MB (megabytes) or use the maximum available space.
- Click “Shrink.”
- Unallocated Space:
- After the shrink operation, you’ll see unallocated space next to the partition you’ve resized.
- Extend a Partition with Unallocated Space:
- Right-click on the partition you want to extend (the one that needs more space).
- Select “Extend Volume.”
- Extend Volume Wizard:
- Click “Next.”
- The wizard will show the available space to extend the volume. Ensure the unallocated space is selected.
- Click “Next.”
- Completing the Wizard:
- Review the information presented.
- Click “Finish” to extend the selected partition with the unallocated space.
- Allocate Space Proportionally:
- If you want to redistribute the space among multiple partitions, you might need to repeat the process of shrinking and extending partitions to suit your desired allocation.
Always keep these considerations in mind while resizing partitions:
- Shrinking a partition might not be possible if there are unmovable system files at the end of the partition.
- Extending a partition is only feasible if there is adjacent unallocated space available.
- Back up critical data before resizing partitions to prevent data loss due to unforeseen issues.
By following these steps, you can resize partitions in Windows 11 using Disk Management to allocate additional space to specific drives based on your requirements.
Section 4: Optimizing SSD Allocation

1. Enabling TRIM Support:
- Improve Performance: By regularly performing TRIM commands, the SSD can efficiently manage its storage, ensuring that new data can be written to the SSD more quickly. Without TRIM, the SSD might experience slower write speeds over time due to the necessity of erasing blocks before new data can be written.
- Extend SSD Lifespan: TRIM helps prevent unnecessary write operations on the SSD. By erasing blocks that are no longer in use, it reduces write amplification, which can extend the lifespan of the SSD by minimizing wear and tear on the memory cells.
Enabling TRIM support in Windows 11 ensures that the operating system actively sends TRIM commands to the SSD. Here’s a general guide on how to enable TRIM for SSD optimization in Windows 11:
- Check TRIM Support:
- Confirm that your SSD supports TRIM. Most modern SSDs do support TRIM by default.
- Verify TRIM Status:
- Open Command Prompt as an administrator. To do this, right-click on the Start button and select “Windows Terminal (Admin)” or “Command Prompt (Admin).”
- Type the following command:
fsutil behavior query DisableDeleteNotify - If the result is “DisableDeleteNotify = 0,” TRIM is enabled. If it shows “DisableDeleteNotify = 1,” TRIM is disabled.
- Enable TRIM (if disabled):
- To enable TRIM, use the Command Prompt with administrative privileges.
- Type the command:
fsutil behavior set DisableDeleteNotify 0 - Press Enter. This command enables TRIM support in Windows.
- Restart the System:
- After enabling TRIM, it’s advisable to restart your computer to ensure the changes take effect.
Please note:
- Many modern SSDs have TRIM enabled by default and manage it independently of the operating system. Enabling TRIM in Windows 11 is often unnecessary for these drives.
- Windows should automatically detect an SSD and enable TRIM support. Manually enabling TRIM is generally recommended only if you suspect it’s disabled for some reason.
Always ensure that your SSD firmware is up-to-date to ensure optimal performance and compatibility with TRIM support. If you encounter any issues or uncertainties regarding TRIM support on your SSD, referring to the manufacturer’s documentation or website for specific instructions is recommended.
2. Utilizing Storage Spaces:
1. Pool Multiple Drives:
- Storage Spaces enables users to pool together multiple drives of different sizes and types (HDDs and SSDs) into a single storage pool.
- This pooling capability allows for better utilization of SSDs alongside HDDs, combining the strengths of both drive types within the same storage pool.
2. Create Resilient Storage Spaces:
- Users can create storage spaces that offer resiliency against drive failures by using mirroring or parity.
- With SSDs in the storage pool, users can allocate them specifically for mirroring, enhancing data redundancy and ensuring higher performance for critical data.
3. Tiered Storage Spaces:
- Storage Spaces supports tiering, which involves using a combination of fast SSDs and slower HDDs in a tiered setup.
- Frequently accessed data is stored on the faster SSD tier, while less accessed or colder data is stored on the slower HDD tier.
- This setup optimizes performance by automatically moving data between tiers based on usage patterns, ensuring efficient allocation of SSDs for frequently accessed data.
4. Increased Performance:
- SSDs within Storage Spaces can significantly improve overall performance due to their faster read/write speeds compared to traditional HDDs.
- By utilizing SSDs for caching or storing frequently accessed data, Storage Spaces can enhance system responsiveness and speed up data access.

5. Flexibility and Scalability:
- Storage Spaces offer flexibility and scalability, allowing users to add more drives to the pool or reconfigure storage spaces as needed without losing data.
- This flexibility enables users to adapt their storage setups according to changing requirements or to take advantage of additional SSDs for improved performance.
Section 5: Best Practices and Tips
1. Regular Disk Maintenance:
- Regularly perform disk maintenance tasks like disk cleanup and defragmentation. However, note that defragmentation is unnecessary and potentially harmful to SSDs due to their nature. Instead, use tools like Optimize Drives (previously known as Disk Defragmenter) that handle TRIM commands for maintenance.
- Use built-in Windows utilities like Disk Cleanup or third-party tools to remove unnecessary files, temporary files, and system junk regularly.
2. Avoid Overfilling the Drive:
- Keep a portion of the SSD space free (ideally 10-20%) to maintain performance and allow the drive to perform wear-leveling and garbage collection effectively.
- Overfilling an SSD can impact performance as the drive needs free space for optimal operation and wear leveling.
3. Manage Page File and Hibernation:
- Adjust the size of the page file (virtual memory) on your SSD. Consider moving it to a different drive if you have multiple storage options.
- Disabling hibernation can save SSD space. In Command Prompt (run as administrator), enter:
powercfg /h off.
4. Disable Superfetch and Prefetch:
- SSDs benefit less from Superfetch and Prefetch features designed for HDDs. Disable them by typing
services.mscin the Run dialog box, locating “Superfetch” and “Prefetch,” then setting their startup type to “Disabled.”
5. Update SSD Firmware and Drivers:
- Ensure your SSD has the latest firmware updates available from the manufacturer’s website. Updated firmware can improve performance and reliability.
- Keep SSD drivers up-to-date through Windows Update or by visiting the manufacturer’s website.
6. Use AHCI Mode and Enable TRIM:
- Ensure that your SSD is operating in AHCI (Advanced Host Controller Interface) mode in the BIOS/UEFI settings for optimal performance.
- Verify that TRIM is enabled in Windows to maintain the SSD’s performance over time.
7. Optimize Windows Settings:
- Disable unnecessary startup programs and services to reduce disk activity and improve system boot times.
- Adjust system settings like indexing options (limit indexing to necessary folders) and disable visual effects to reduce unnecessary disk writes.
8. Update Windows and Drivers:
- Keep Windows 11 updated with the latest patches and updates. These often include performance improvements and bug fixes.
- Ensure all device drivers, especially those related to storage and chipset, are up-to-date to maintain compatibility and performance.
Conclusion:
In conclusion, optimizing Solid State Drive (SSD) performance in Windows 11 is essential for maximizing the benefits of these storage devices, such as faster speeds, improved responsiveness, and increased reliability. Efficient SSD allocation involves various strategies and considerations to ensure optimal performance and longevity.
By following key practices like enabling TRIM support, managing storage space effectively, performing regular maintenance tasks, and adjusting system settings, users can enhance their SSD’s performance and lifespan. Utilizing Windows features like Disk Management, Storage Spaces, and built-in maintenance tools can aid in efficiently allocating SSD space and managing storage effectively.
Remember, SSD optimization involves a balance between performance, storage usage, and maintenance. It’s crucial to maintain a reasonable amount of free space on the drive, regularly update firmware and drivers, and perform routine disk maintenance to keep the SSD running smoothly.
By implementing these strategies and best practices, users can harness the full potential of SSDs in Windows 11, enjoying faster speeds, improved system responsiveness, and a more reliable computing experience while ensuring the long-term health of their storage devices.

Leave A Comment